Tuesday, January 12, 2010

2 Pant Jacket

This refashion is another from my 5-patterns-by-tax-day challenge. The original garment was Anne Taylor twill capri pants. They were leftover from a friend's yardsale, so I don 't know their history (how old, etc).

BEFORE:


Sorry if you were hoping that I'd model them, I could lie and say that they didn't fit but the real reason is that my worst nightmare is having a picture of myself in tapered pants posted to the internet. But they were worth saving, I couldn't resist the print!


I took the time to rip out the seams (took forever but I needed to preserve as much fabric as possible so I had to save the salvages, otherwise I would have just cut them apart). Here's a rough sketch of how I cut the jacket pieces from the pants (in reality the pattern pieces were right up to each edge):
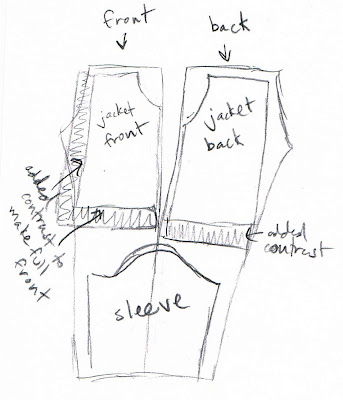
There still wasn't enough fabric for a stream-lined version of the longer jacket from Simplicity 2652, so I found a second pair of twill capri pants in black (50-cent bin of course). The pattern has a neck band that I did in the contrast fabric, and then I added contrast strips to the bottom and middle front to make each panel the size of the pattern. I was hoping to add contrast to the sleeves but there wasn't enough fabric left from the second pair of pants.

AFTER:

The jacket comes out very boxy, as you can see from the back:


I think the sleeves are adding to the boxiness, but I had to do a shortened version of the long sleeve option because the gathered sleeve options were too wide to come out of the bottom of the tapered capri pants.
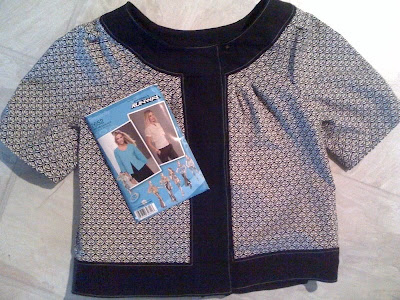


I was apprehensive about using a "Project Runway" branded pattern (I'm a huge fan of the show, and not a fan of patterns/pattern companies) and I wouldn't give the pattern more than 3 out of 5 stars, but the jacket is still cute in the front. In defense of the Project Runway patterns, they do treat elements separately so that the sewist isn't intimidated to swap the sleeves from one view to go with the collar from another, etc. I wish more patterns treated the user as an intelligent creature, capable of making design decisions.

I'm considering adding buttons to this (currently it has the hook and eye from the original pants) but it isn't giving a sturdy enough fasten... I also think I might shorten the sleeves a bit more? What do ya'll think?

Friday, January 8, 2010

I'm back in the game...

I'm participating in The Wardrobe Refashion Challenge once again.

4 month pledge

It's somewhat addicting as it allows me to combine 2 things I love: sewing and thrifting. So here's the first project from my current pledge period...

It was a weekend night in August or September when a friend and I came across a 5-patterns-for-5-dollars deal at Joann's (dinner and a fabric store, we live life on the edge as you can tell). I must have been out of my mind when I challenged my friend to make something from each of the 5 patterns we picked out with a deadline of tax day. (She actually sews from patterns whereas I rarely do, so this was a really kookie suggestion on my part). Seeing as that deadline is a few months away, I thought I should probably make the first effort at my part of that deal.


The "fabric" is a thrifted purple ladies polo shirt (IZOD in the 50-cent bin, hooray!) and the pattern is Simplicity 2570.


The necessary "before" shot...


It needed ironed, but why make the "before" look any better? Successful refashioning is about contrast. Here's a close-up of the fabric to give the original a bit more merit!

I also used some scraps from a ragged old grey undershirt that I acquired, since there wasn't enough fabric in the original shirt for the neck and arm-hole facings.


And the after...


I think it's pretty darn cute. Since I was limited by the size of the original shirt, I had to reduce the fullness of the middle front panel to about half of the pattern, but this might not be a bad thing because too much fullness can look a bit maternity. There are darts in the back which gives a nice shape, and I omitted the zipper since this is a knit. As I am prone to do with my refashions, I preserved the hem from the original shirt... I'm not sure if this makes me part genius or just generally lazy :)

Want to see what the other Wardrobe Refashion participants are up to? Click HERE.


Thursday, December 31, 2009

Year End Potholder


There are a bazillion potholder tutorials on the web, and for good reason... they're easy to make, quick to finish, and often just a tiny little quilt.

The project in this post is a hodge-podge of tutorials and techniques that I've been wanting to try, but my favorite thing about it is that each of the fabrics were used in a quilt I made in 2009, so it was a great project to reminisce a bit.


First, the potholder shape/structure (square with triangle pockets on back as shown below) came from a tutorial by Field Trips in Fiber. I made mine a bit larger than the tutorial's dimensions.


Next, I paper pieced the top with strip scraps. Film in the Fridge has a great tutorial on this technique.


Lastly, this was the perfect opportunity to try "pebble quilting" as demonstrated in a video by Handmade by Alissa. I've wanted to try this for a while, but Alissa has warned in other posts that it's time consuming and recommended for smaller quilts. Below is the inside of the potholder, to demonstrate the outcome of this technique. It's messy but very forgiving!


I so wish you could feel texture through the computer screen... here's one last photo to give you an idea of how lush the pebble quilting feels with a thick batting.


Happy New Year to all!

Sunday, December 20, 2009

Not so De-Vinyl...

I got a lovely KitchenAid Mixer for my birthday (thanks Mom!) and after my aunt mentioned how dusty hers gets I thought I'd sew a cover for it...

There's a free tutorial for appliance covers from sewing.about.com
DISCLAIMER: The tutorial I followed is perfectly adequate, all failures associated with this project are from my own not-so-well-thought-out adaptations.

Like most KitchenAid owners, I think my appliance is beautiful and don't want to hide it away in shame, so I thought clear vinyl would be the solution. I changed the pattern to be 2 inches shorter, and then added 3 inches of cute fabric. (My model has a glass bowl which I think is slightly larger/wider)

Not completely terrible from a distance:


One of the problem areas up close:


The main problems are that the seams won't turn out properly, and the fabric along the bottom is not stiff enough to compete with the vinyl. I realize it could be much worse, I'm just still baffled by how bad this looks compared to my initial mental imagine of it. It's not so bad that it's not going to sit on my kitchen counter until I find a way to fix or replace it... but that's because I just moved and have too many other home sewing projects in my head that this one needs to stew for a while.

One or both of the following likely lead to my demise:
#1 - The vinyl I selected was probably too thick (16 gauge)
#2 - Sewing curves in vinyl is very challenging, and this pattern is two ovals being sewn to a rectangle. Women of the 1950s that sewed vinyl slip-covers for their living room furniture must have had crazy sewing skills (and unlimited patience).

To redeem my sewing confidence, I challenged myself to make a softie in an hour last night (challenge prompted by realizing that it was the Saturday before Xmas which meant the stores were all packed with shoppers, and I didn't have a gift to take to a First Birthday party that was going to start in 2 hours.) It ended up taking an hour and 20 minutes, but that's from the time I sat down at the computer to google a softie tutorial, and includes the time rummaging through my fabric bins deciding what to use. The green dots from the mixer cover also made it onto Lucy the Goosey, for which you can find a free tutorial from The Long Thread.

The one-year-old recipient grabbed and carried her by the beak immediately, so I figure that's enough of a compliment to get me back to my home-sewing projects.